
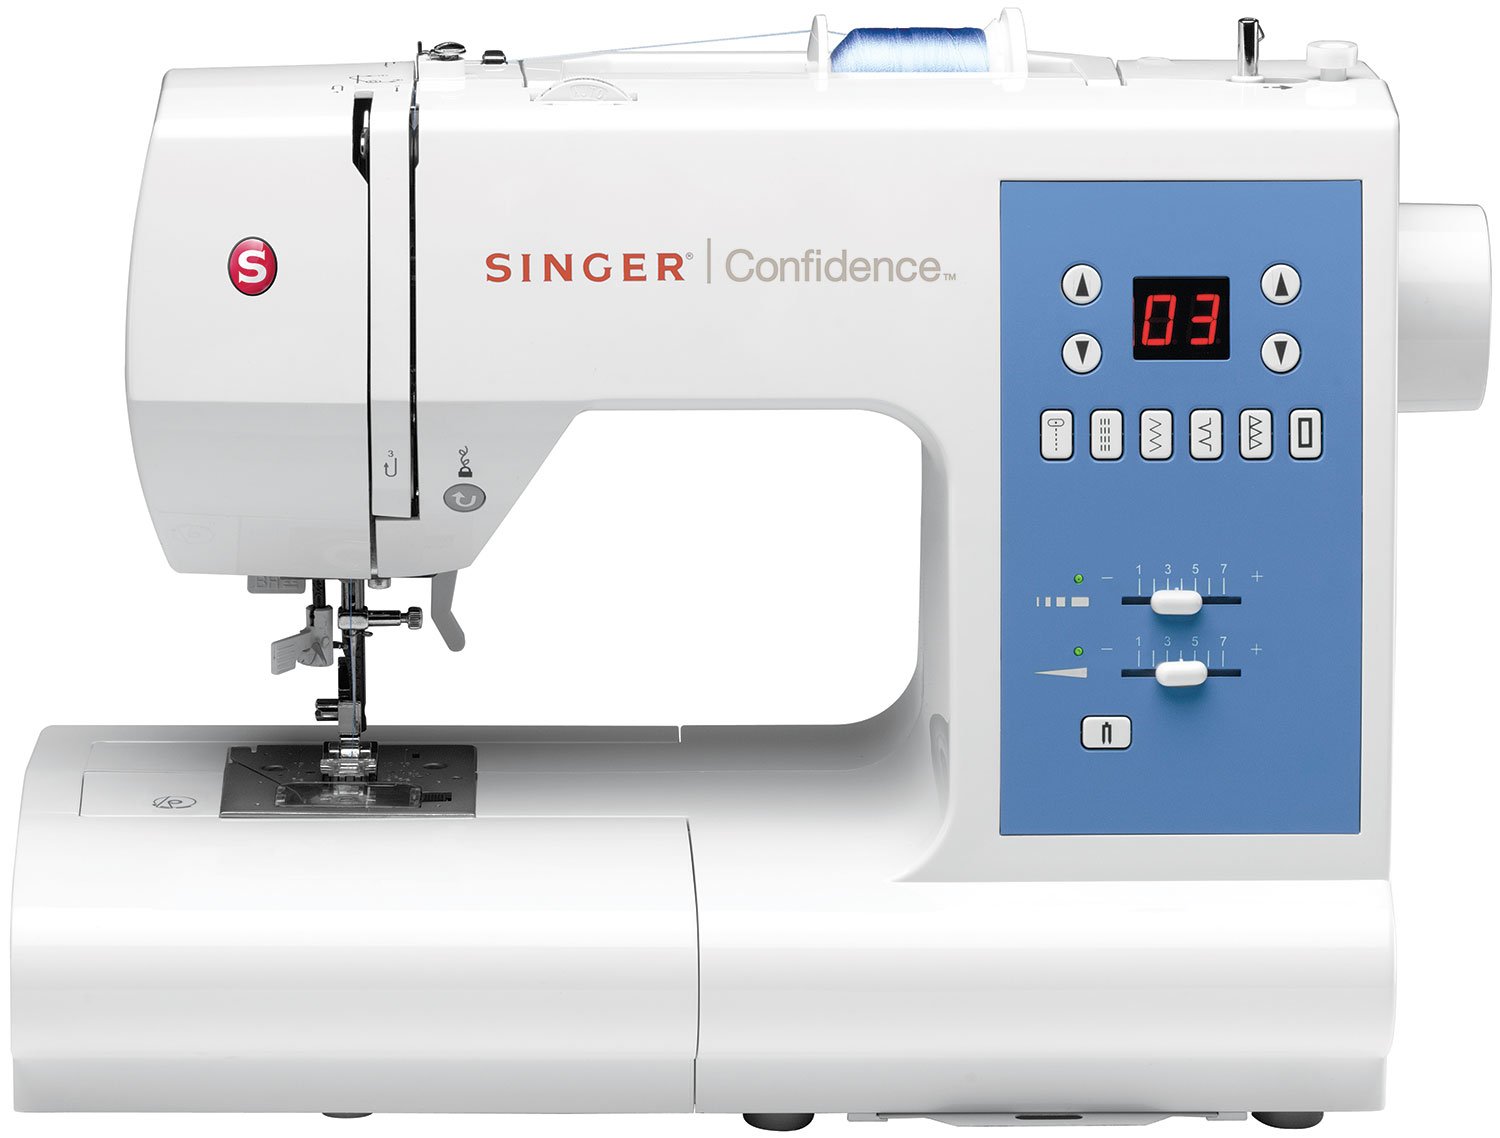
The Anatomy of a Sewing Machine: Parts and Their Functions
Sewing machine meets User :)
I think it is so exciting when your long awaited, meticulously picked and researched machine arrives and you finally get to make things with it! It’s a whole new world! In my blog post I have written about the tips I wish I really have listened to and really took it to heart and the time right at the beginning when I started my sewing hobby instead jumping straight right into the middle, but I was so impatient. I wanted to make things and I though the knowledge I already had with previous machines and my trust in the new machine will take care of me. We can’t expect from any machinery perfect smooth work without regular maintenance, care and giving them the respect to actually get to know them.
Otherwise it will feel offended and hold a grudge for a long time till it proves to you its point in many little difficulties and proves - you really should have took the time to get to know me first before lay your hands on me! haha
I wish I took the time I got to know every little inches of my sewing machine, because knowledge is power and being aware of many important crucial settings, functionalities can save you a ton of time, a bunch of headache and set you up to great success right from the top.
Mostly all sewing machines differs at first sight, however each of them have all basic features and they are similarly built regardless of the brand or the model.
Always study the user manual and take the time to get to know your machine, even if you have had sewing machines before.
Each of them has a spool pin, which a small metal arm on top where your thread is placed so then it can be fed into the machine so you can create. Then the bobbin provides the under-stitches of the main stitch itself and holds everything in place. Sewing machine needles and many types of presser foot are changeable project to project and of course you have the pedal, which looks just like a gas pedal and allows you to control the speed of the whole sewing.
It is important to note that these are powerful tools so never hold your hands near the foot presser or the needle whilst keeping your feet near the foot controller. Always sew with precaution and take it slow till your get a feeling and built up a reference in your mind and completely get to know your machine. Keep your finger a few centimetres away from the fabric feeder at all times and take it slow. These needles are very sharp, they need to go through those heavy thick fabrics so I don’t have to remind you how important it is to be mindful. As soon as you stop take your feet off your feet controller taht will prevent setting the machine accidentally in motion causing injuries or unwanted stitches. If you take a longer pause you can switch your sewing machine off completely. It will save lifetime to your little light bulbs built in the machines.
Don’t ever forget that you can actually dictate the rhythm of the stitching even in a snail space ? The control is in your hand, or actually in your foot by releasing your foot you can add less pressure to the feet controller and sew slow till you get comfy.
Go as slow as you feel like it is not a competition it is all about having fun and enjoying the learning process.
But now, let’s meet sewing machine!
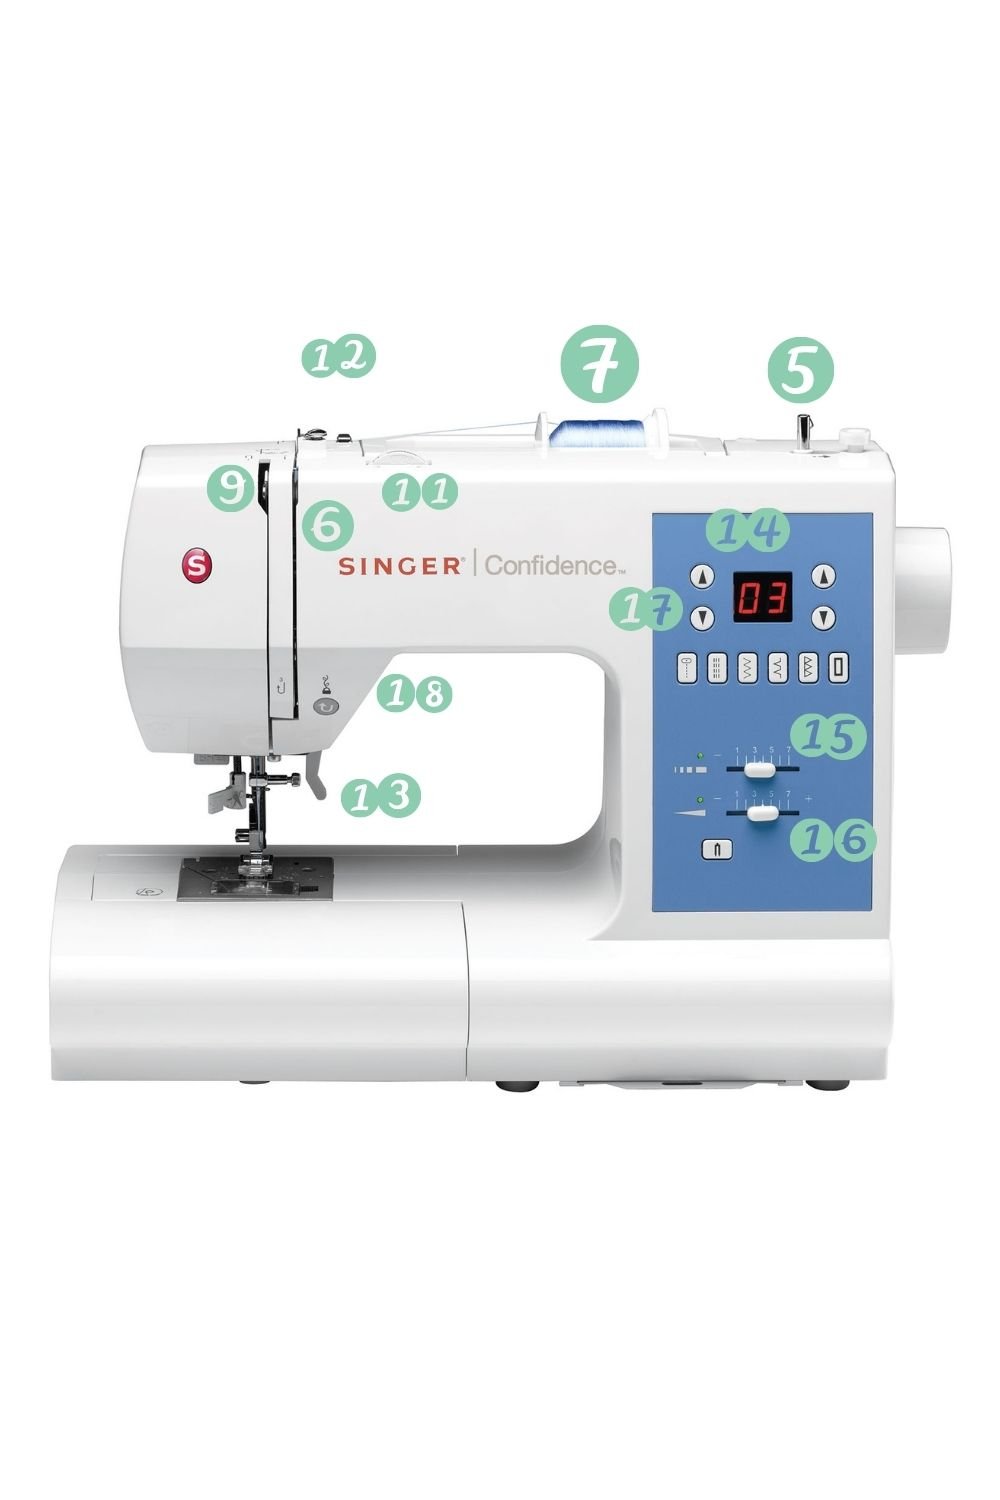

Presser Foot (1)
Sewing machines come with many different removable foot. Different foot are created specifically for certain materials, and sewing methods, like when a zip needs to be applied the zipper foot needs to be inserted. For a blind hem there is a specific feet. This tool keep the fabric in place.
Bobbin and Bobbin Case (2)
Bobbin case is underneath the foot presser and this case holds the bobbin. The bobbin is a reel of thread which is making up the underside of the stitches so then the sewing line is actually fixed. It is important we have them especially for the machine we are using as if we don’t apply the right bobbin it can stop our machine working properly.
Slide Plate or Bobbin Cover (3)
It is located just right under the pressure foot and it keeps hold of the bobbin and its case with little marks on it which helps to keep the stitching straight.
Needle and Needle Clamp (4)
The needle clamp fixes and hods the sewing needle in place, you can release the clamp when a change of needle is necessary. Of course there are plenty of types of needles since each projects, textile and material requires a different care and attention in order to have a nice finish.
Bobbin Winder (5)
It is the place of an empty bobbin where it should be placed, then the winder will fill this up evenly from the spool.
Tension Disk (6)
The tension disk helps guide the thread between the spool and the winder when bobbin is placed on the external bobbin winder.
Spool Pin (7)
This metal arm that sticks out on the top holds the thread and makes sure that it feeds the thread. It can be horizontal or vertical, horizontal one ensures smoother process.
Throat Plate (8)
It is another metal plate with a few tiny screws on the top. It is situated under the presser foot and the needle and it serves a great help to the fabrics and the stitches, as it is helping in the fabric management with little micro movements and allowing the needles to pass through the material and actually stitch.
Take-Up Lever (9)
It is basically a system that served the thread. Top thread passes through the lever and it is located directly above the presser foot. it pulls the thread from the stool and feed it tot the machine and lift it back out after a stitch has been made.
Feed Dogs (10)
These little metal teeth like ridges can be seen in the throat plate, which slightly moves as you sew. It has a little control mechanism towards the stitch length and the fabric as we go.
It is important to allow it to work its way and not we move the fabric with our hands manually as it can confuse the system and can break the needle in.
Tension Regulator (11)
Thread tension must be set all the time, there are times when it is set too high then the stitches can be too tight and can break, sometimes you can see loose stitches then it most probably not a successful hold. Then set the right tension which is connecting the bobbin and and the top thread so they can make nice healthy stitches.
Thread Guides (12)
From the spool pin, thread passes through these metal loops and they have also a regulatory role in setting the tension.
Flywheel (13)
Raises and lowers the take-up lever. Always turn the flywheel “hand” toward you, it will also turn toward you as you press the foot controller.
Stitch Selector (14)
It is the main display on sewing machines, where a types of stitches can be selected either manually if it is a dial system and an older machines, if it is a newer machine they have buttons to select programs.
Stitch-Length Selector (15)
It is either a dial or lever on your sewing machine that lets you select the length of the stitches on manual/electronic machines. Stitches are measured differently, depending on the machine, before getting familiar try and test on a piece of scrap fabric and see the comparison. Generally recommended to use medium length generally, shorter stitches for fine and longer stitches are good for heavier textiles. If you need to gather the fabric for example you make ruffles or flowers long looser stitches are the best.
Stitch Width-Selector (16)
It is either a little dial or a tiny arm that allows you to widen the size of a decorative stitch, or zig zag stitch which is perfect substitute for an interlock finishing off fabrics if you don’t own a serger machine.
Menu Screen (17)
On computerised and electronic sewing machines, the menu screen allows the adjustment in functions and stitches, sometimes replacing the separate stitch, stitch-width, and stitch-length selector dials.
Reverse-Stitch Button (18)
Pressing this button will reverse the direction of the stitches, that is often used at the end and the beginning of a seam to secure the thread.
Foot Controller (19)
The speed of the stitches can be controlled by pressing on this pedal.
YOU MAY ALSO LIKE


Hello!
I’m Dori, so glad you are here! Spice it up with Dori is a blog about bright DIY fashion, crafts & lots of colourful, fun, innovative endeavours. My aim is to be an ambassa-dor-i of creative living, thinking and making with an upbeat positive vibe so you can as well cultivate a life full of inspiration & spice things up with your personal touch.


Creativity is a way how we can switch on our innate thinking to connect seemingly un-connectable ideas and try to turn blocks into opportunities. Open our minds to new ideas and think outside of the box.